
The Whimsical. A DIY Disappearing 9 Square Baby Quilt.
- Feb 7, 2015
- 5 min read

You will need
Sewing Machine - I have a Janome DC1050 which is a basic sewing machine, so you don't need anything fancy to make a quilt.
Walking Foot- I didn't use one, but they suggest it for making quilts.
Thread- I used white, pink, and a blue to match the backing
Iron
Ironing Board
Scissors
Rotary Cutter
Fabric Cutting Mat
Fabric- You will need 10 different patterns/colors ( you can choose whatever colors and patterns you want). One for the backing and 9 for the front of the quilt. You can choose to buy an 11th color in 1/2 yard for a binding or use the colors you already have to make a binding.
Backing-1 yard. *** I had to trim the front of my quilt down a little to be the same size as the backing. Its the width that didn't match up quite the same. So buying a little extra in width won't make much of a difference.
Front- 1/2 yard of each color ***You could get away with buying 1/4 yard of each color, but if you make a mistake ( like I did when I was going through the motions) you'll be wishing you had a little bit more fabric. Also if you buy 1/2 yard of each you will have enough of whichever colors you want to make your binding.
Batting- 1 yard ***I bought the pre-washed batting from Jo-annes in king size. That way I am able to use this binding for multiple projects
*Note: sew all fabric together with a 1/4" seam
***If you want to use the fabric that I chose:
Backing(1yard): Keepsake Calico Fabric-Bird Cage
Front(1/2 yard each): Keepsake Calico Fabric-Large dots on black
Keepsake Calico Fabric-on seafoam
Keepsake Calico Fabric-Bed and Breakfast Floral
Keepsake Calico Fabric- Crosshatch Pink
Quilters Showcase Fabric-Damask Gray Tonal
Quilters Showcase Fabric-Damask Aqua and White
Quilters Showcase Fabric- Scroll Pink and White
Country Classic Cotton Quilt Fabric Solid-White
Country Classic Cotton Quilt Fabric Solid-Gray
Batting(1yard): Warm and Natural-King Size http://www.joann.com/warm-and-natural-king-size/12378360.html
Binding: I used the Solid Gray and Crosshatch Pink after I cut out the front squares
1. Cutting Fabric into strips
I got the idea to do the disappearing 9 patch from here.
Cut 3 (4.5"x18") strips or 4 (4.5"x13.5").
I chose to do 4 (4.5"x13.5") because a half cut yard is 18" in length. So if you do it right you should be able to get all 4 strips out of the 18" side.

2. Cut Fabric into squares
Then cut your strips into 4.5"x4.5" squares. Which will end up giving you 12 (4.5"x4.5") squares of each color.
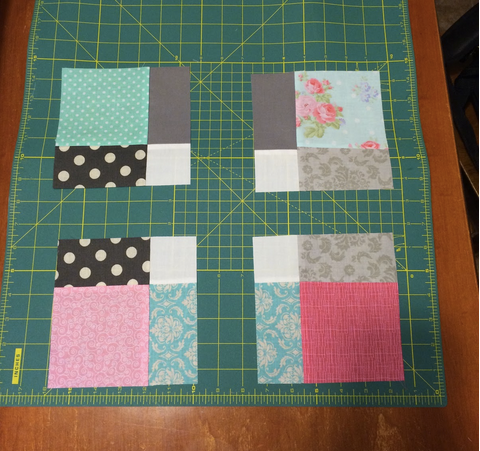
3. Form larger

squares
Next put your 4.5"x4.5" squares 3x3 like this picture. You can lay them out in so many different ways. Thats what makes this quilt so fun! The versatility!
4. Sewing Fabric Together
Then sew three together
into three rows. Followed by sewing those three rows together making it a large 3 square by 3 square.
When I first saw how to make a disappearing nine square it said to make it 12.5"x12.5" by squaring it up. I chose to make mine 12"x12" though. So that I would have 6" squares to work with.
***Make sure that every time you sew your fabric together that you press your seam open with an ironing board.

5.Cutting the 3x3 square One you have them all sewn together into one square, cut it down the middle length wise and width wise.
It helps if you have a 6"wide ruler because then you can line it up with the edge and cut straight down the middle without fussing too much with it.
Then it will leave you with 4 (6"x6") small squares.
6. Picking your layout

You can lay them out SOOO many different ways. These are just some examples of ways you can lay them together. There are so many different combinations. So have fun! I chose the top left.

7. Sewing your
rows
Sew your 6"x6" squares together into a 2 square x 2 square larger square.
Followed by sewing 3 of those squares into a long strip.
Then sew those 4 strips all together.
***Remember to Press those seams open with your Iron every time you sew.
8. Basting the quilt

This will give you a quilt top that is 6 (6"x6") squares by 8 (6"x6") squares.
Now lay your backing face down on your working area. Followed by your batting. Then lay the front of your quilt facing up.
Pin it all together with saftey pins so it doesn't move around on you. Then stitch in the ditch along the rows.
9. Stitching in the ditch
I sewed down inbetween my 6 rows, and then inbetween my 8 rows the other way. I didn't worry about sewing the little lines in each of the 6"x6" squares.
Here is a video on how to stitch in the ditch.

10. Making your binding
Next you are going to make the binding. I watched this tutorial when I was making my first quilt.
Click here to watch that tutorial.
She shows some great tips on how to do the binding. I don't follow exactly how she does it at the end, because I machine bind the entire thing.
Cut 11 (2.5"x18") strips. Then sew them together like I show in the pictures below. The bottom strip will be face up and the top strip will be face down. She shows it very well in the video.
Sew the strips (seen in the picture on the right) simultaneously. So the fabric that was face down, will now be the fabric that is face up when you sew your next strip together.


Then they will look like this. That way you use less thread.
Cut the thread that is binding them and lay it out flat.
***Again remember to press your seams open flat with your Iron

Then fold your binding in half and press it with your iron.
11. Attaching the binding to the back

For attaching the binding I do it a little bit differently than the video I put the link for previously.
Here is a video on how to machine bind your quilt.
Click here for that video.
Instead of sewing your binding onto the front, you sew it on to the back. Make sure it is lined up with the edge. I use a pink bobbin thread so that its an easy line to follow on the other side.

12. Attaching the binding to the front
Pull the binding around to the front and line it up with the thread line. I used a decorative zig zag stitch for this.

When you line it up with the pink line ( or whatever color you choose) it should show up on the edge on the front and back.
Then your front is securely stitched on, and you don't have lines all over the place on the back of your fabric.
Tada you are DONE!!! Great Job! I knew you could do it.


Comments